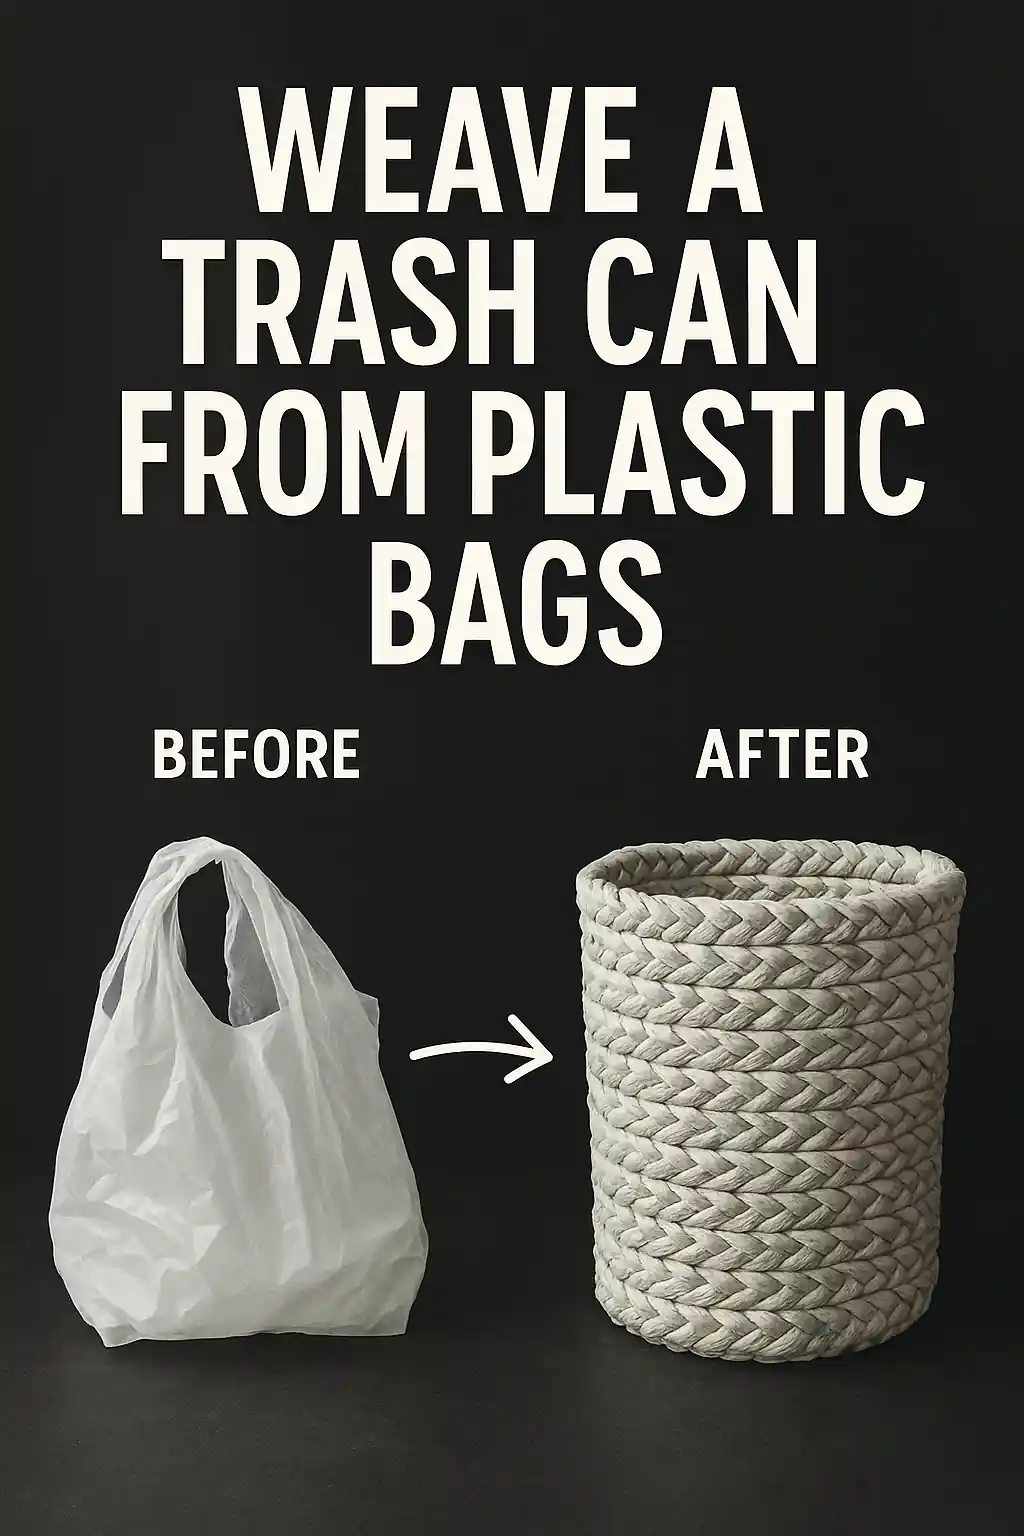
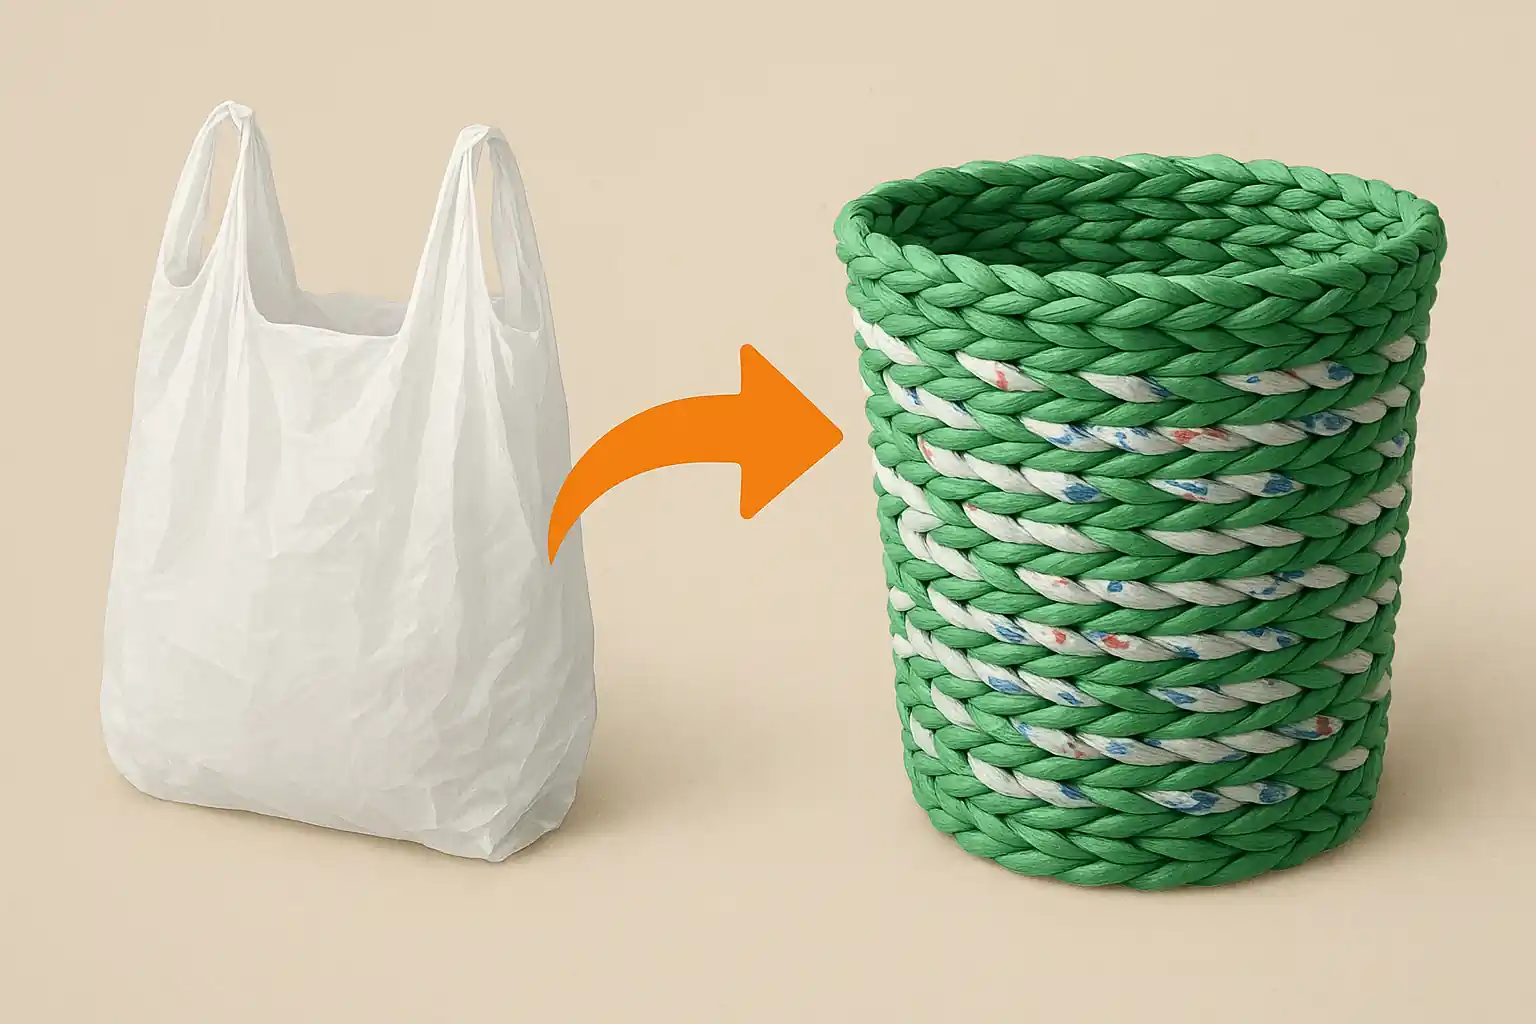
How to Weave a Trash Can Using Old Plastic Bags?
Every household accumulates plastic shopping bags. These flimsy carriers pile up under the kitchen sink or in drawers, destined for the landfill where they take decades to break down. Rather than tossing them out, you can transform those bags into something useful and attractive. Weaving a small waste basket from plastic grocery bags is a creative way to divert them from the trash and give your home a handmade touch. This project fits neatly into the growing trend of sustainable crafts that turn throwaway materials into functional items. It also provides a relaxing pastime that requires only simple tools and a bit of patience. In this article you will learn how to prepare the bags into craft ready strips, braid them into a sturdy cord, and coil that cord into a rustic container. By the time you finish, your once messy stack of plastic bags will become a decorative can that can sit in a bathroom or bedroom.
Stay Updated. Skip the Guesswork.
Get daily trash pickup alerts, holiday changes, and zip-code-specific updates straight to your inbox — all for just $10/month.
🔔 Subscribe & Get Daily AlertsCancel anytime. Perfect for busy households, seniors & renters.
Why upcycling plastic bags matters
Single use plastic has become an environmental challenge. Millions of bags are used every day for groceries and shopping, and most are discarded after a single trip. Because the material does not biodegrade quickly, these bags contribute to pollution in waterways and landscapes. Upcycling offers a way to keep plastic out of the waste stream. Turning bags into a woven trash can means you are reusing them rather than sending them to the landfill or letting them blow down the street. When you turn waste into something useful, you also save money on buying new products. Crafting with recycled materials encourages a more mindful approach to consumption and can inspire others to think about how they use everyday items. Although a small project like this may seem insignificant compared to global plastic production, every effort adds up. If more people repurposed their plastic bags, the demand for new ones would decline and there would be less litter on the planet.
Related Articles:


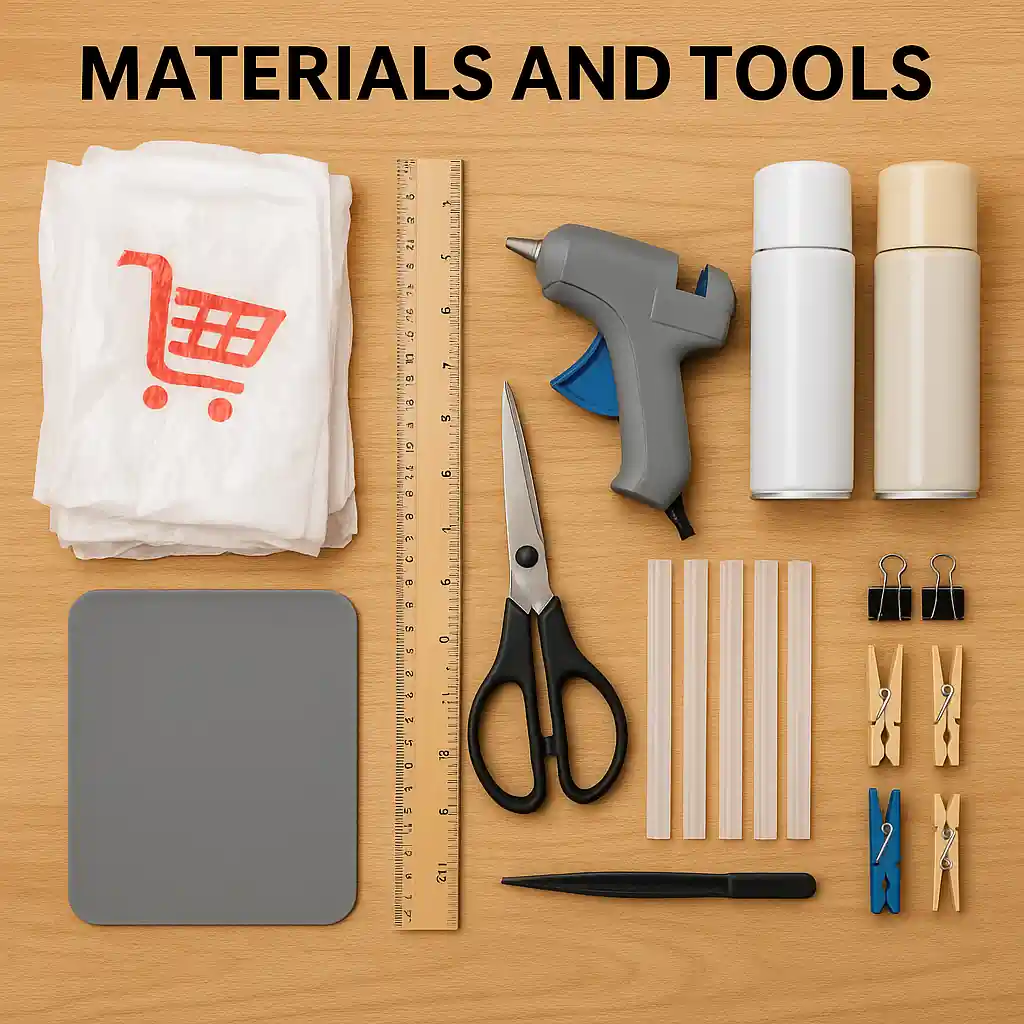
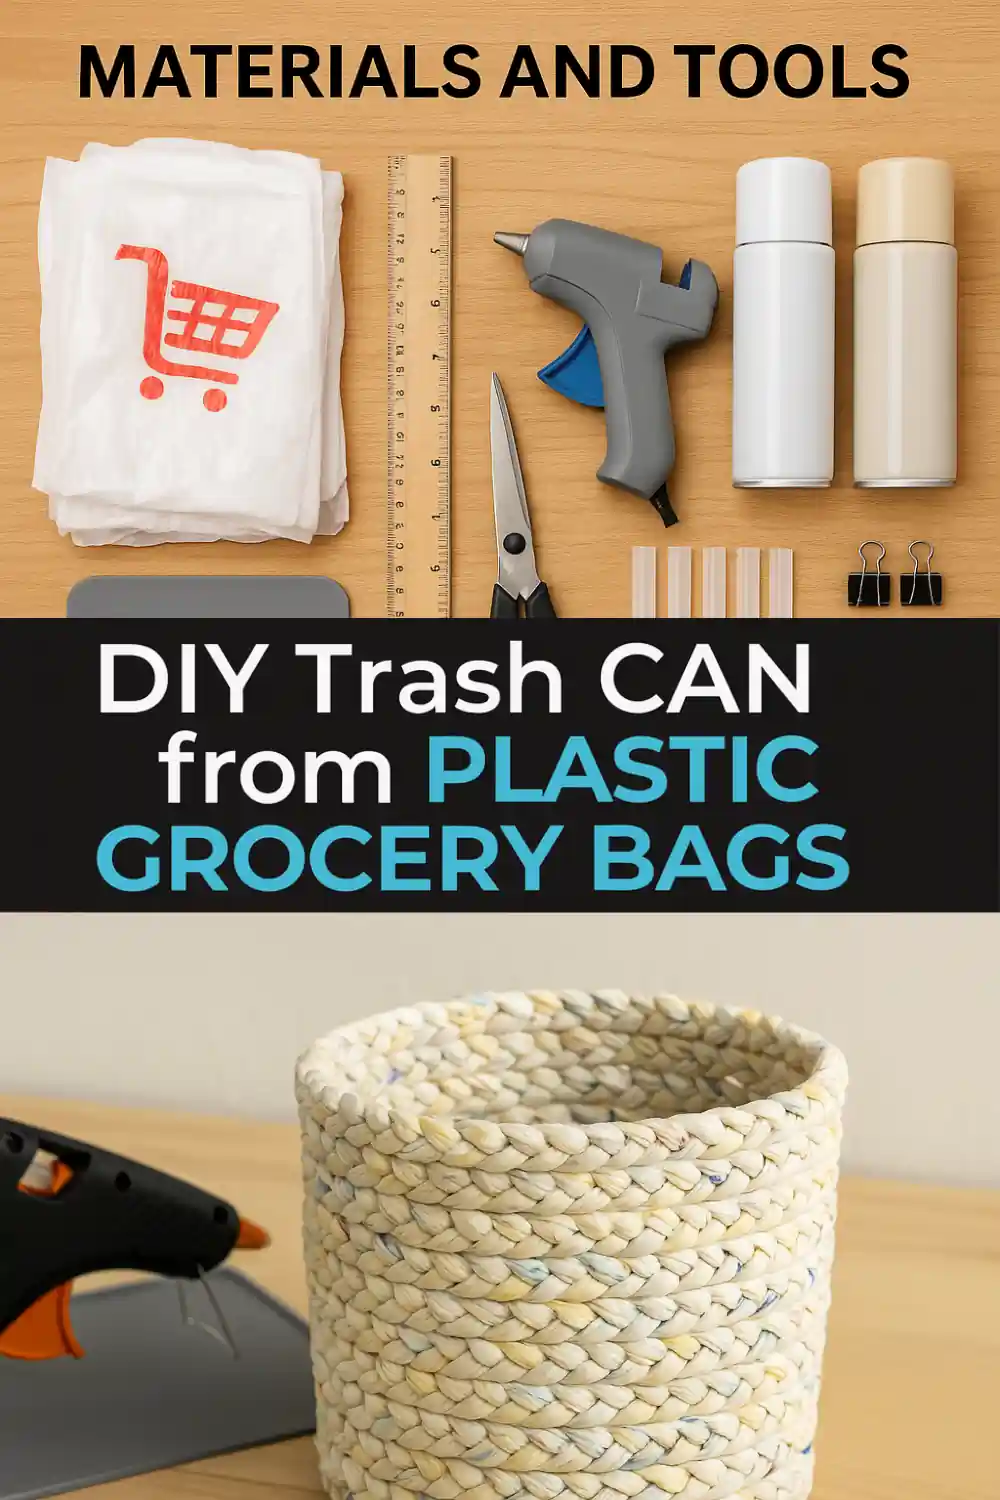
Materials and tools
Before you begin, gather everything you need so that the process goes smoothly. You will require a collection of clean plastic grocery bags; the number depends on the size of the can you intend to make, but a medium sized basket uses dozens of bags. A good pair of scissors is essential for cutting the bags into even strips. A ruler or measuring tape helps ensure that each strip is about two inches wide, which gives a consistent look to the finished braid. You will also need a hot glue gun and plenty of glue sticks. The hot glue secures the braided cord as you coil it into shape. Optional supplies include clothespins or binder clips to hold the braid together while you work, and spray paint if you wish to add color later. A flat surface to work on will make the task more comfortable, and a protective mat is helpful when using hot glue.
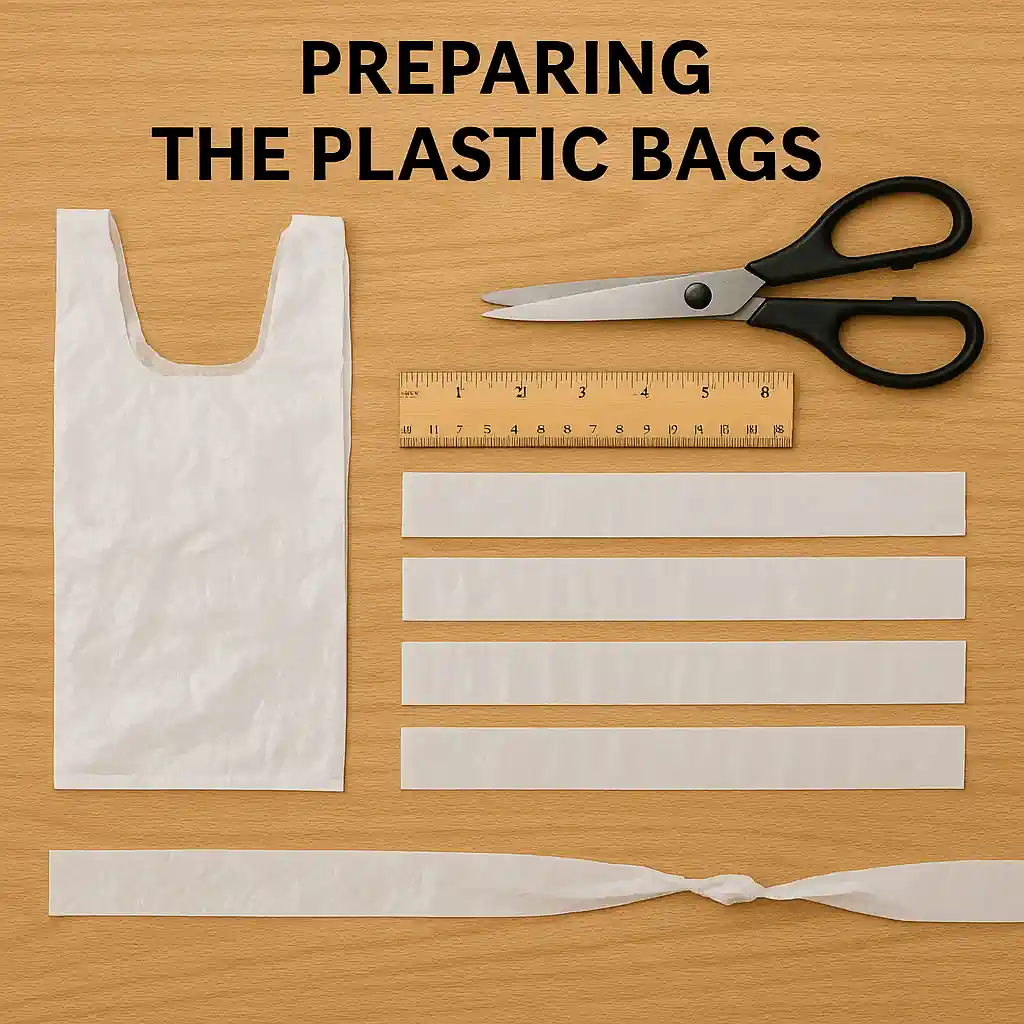
Preparing the plastic bags
Begin by sorting your bags and flattening each one. Smooth out any crumpled areas so that the material is easier to cut. Trim off the handles and bottom seam using your scissors. Removing these parts leaves you with a tubular section of plastic. Next, cut the tube open along one side so that it lays flat. Using a ruler, measure across the plastic and mark out strips that are roughly two inches wide. Two inch widths produce a rope that is thick enough to be durable but flexible enough to coil easily. Cut along these marks to create long rectangular strips. Continue until you have a pile of strips from all your bags. To make a continuous cord you need to join strips together. Take two strips and overlap their ends by about an inch. Fold the overlapped section and make a small slit through both layers. Pull the opposite end of the second strip through the hole in the first strip and gently tighten. This forms a knotless join that lies flat. Repeat this joining method until you have a long chain of strips known as plarn, or plastic yarn.
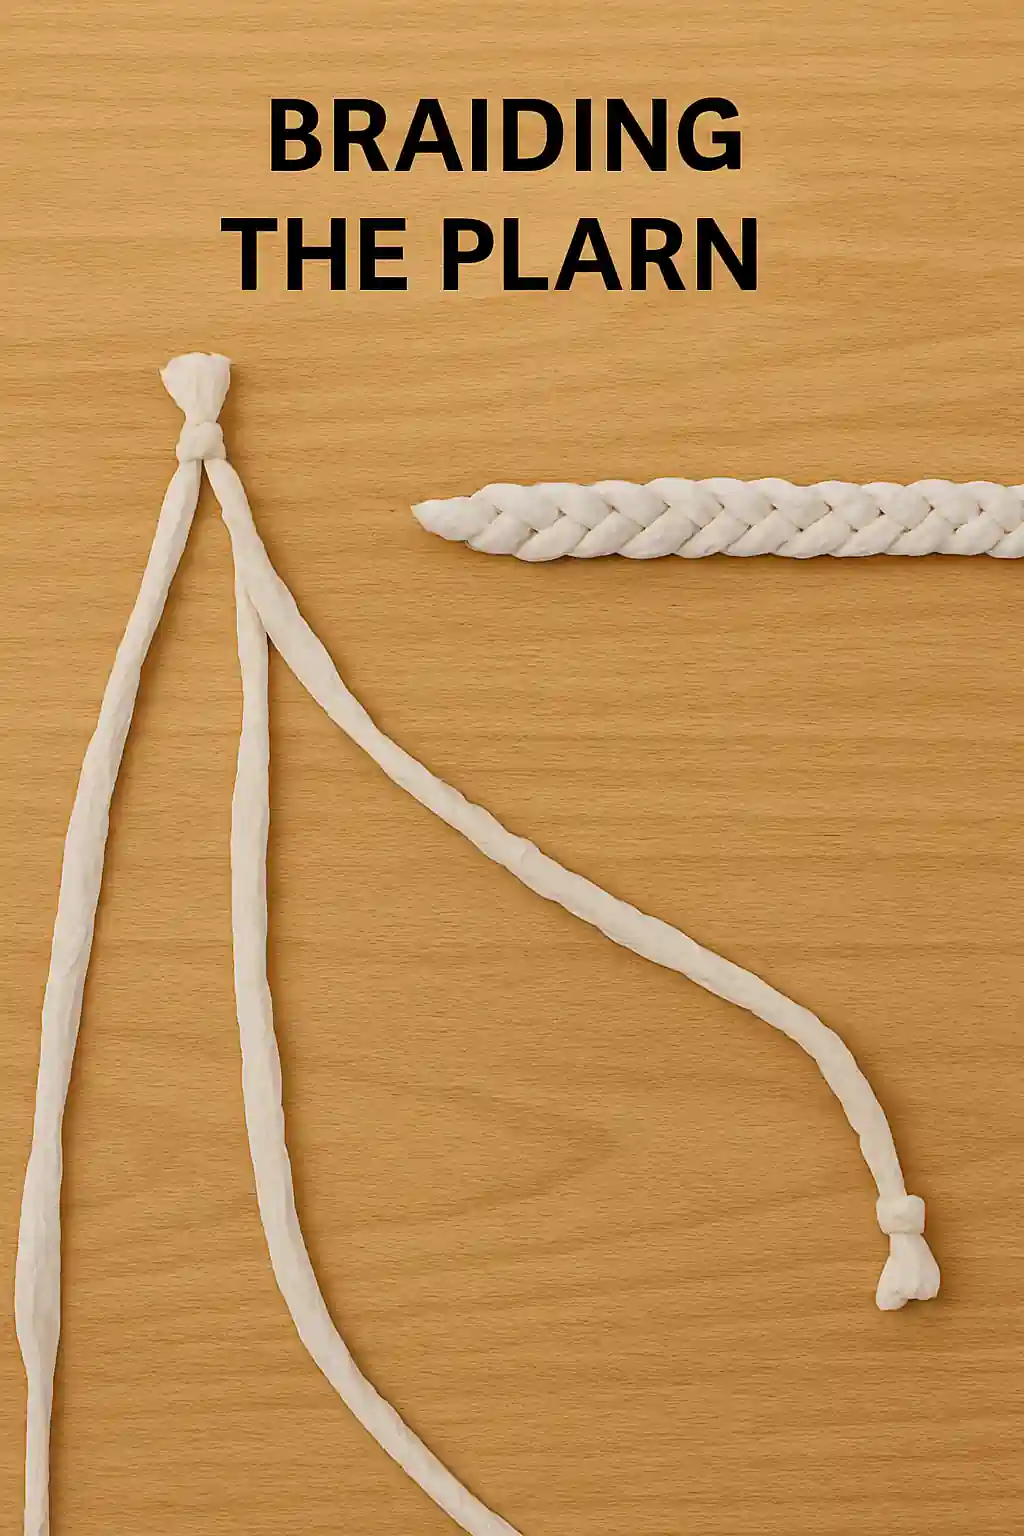
Braiding the plarn
Once your plarn is ready, divide it into three long lengths. Tie the three lengths together at one end with a simple knot. If the cord feels too thin, you can double each strand. Secure the knotted end to a stable surface, such as taping it to a table or clipping it under a heavy object. Begin braiding the strands the same way you would braid hair. Cross the right strand over the center strand, then cross the left strand over the new center strand. Continue alternating right and left, keeping your tension even so that the braid remains uniform. When you near the end of a strand, join another strip using the slit method described earlier and keep braiding. The goal is to produce a braid that is long enough to form both the base and the sides of your trash can. Depending on the height and diameter you want, the finished braid may be several yards long. Once you are satisfied with the length, tie a knot at the end to secure the strands and trim any excess.
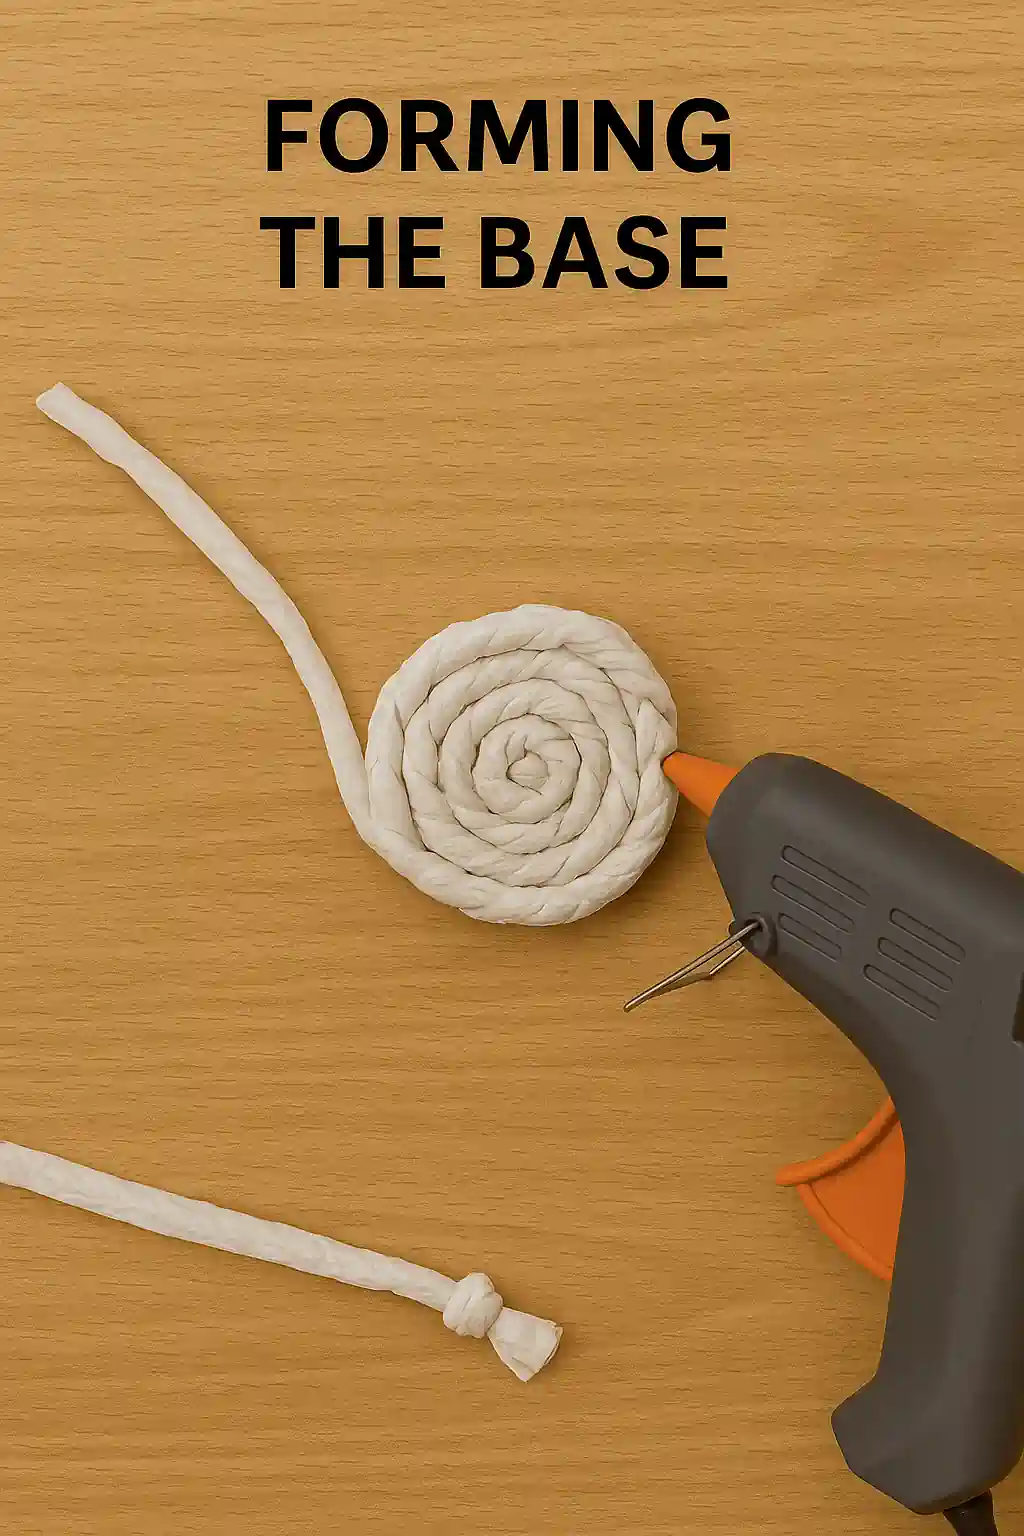
Forming the base
The next stage transforms your braided plarn into a basket. Lay the braid on a flat surface and coil it into a tight spiral. Start with a small loop and gradually wind the braid around it, pressing the turns together so that there are no gaps. After forming a few coils, apply hot glue between the layers to hold them in place. Work slowly, adding glue and pressing the braid firmly. Keep the spiral flat and circular by adjusting the tension of the braid. When the base reaches the desired diameter, perhaps six to eight inches for a small bathroom can, continue coiling, but now begin stacking the braid on top of the outer edge of the base rather than alongside it. This shift from flat coiling to upward stacking creates the walls of your container.
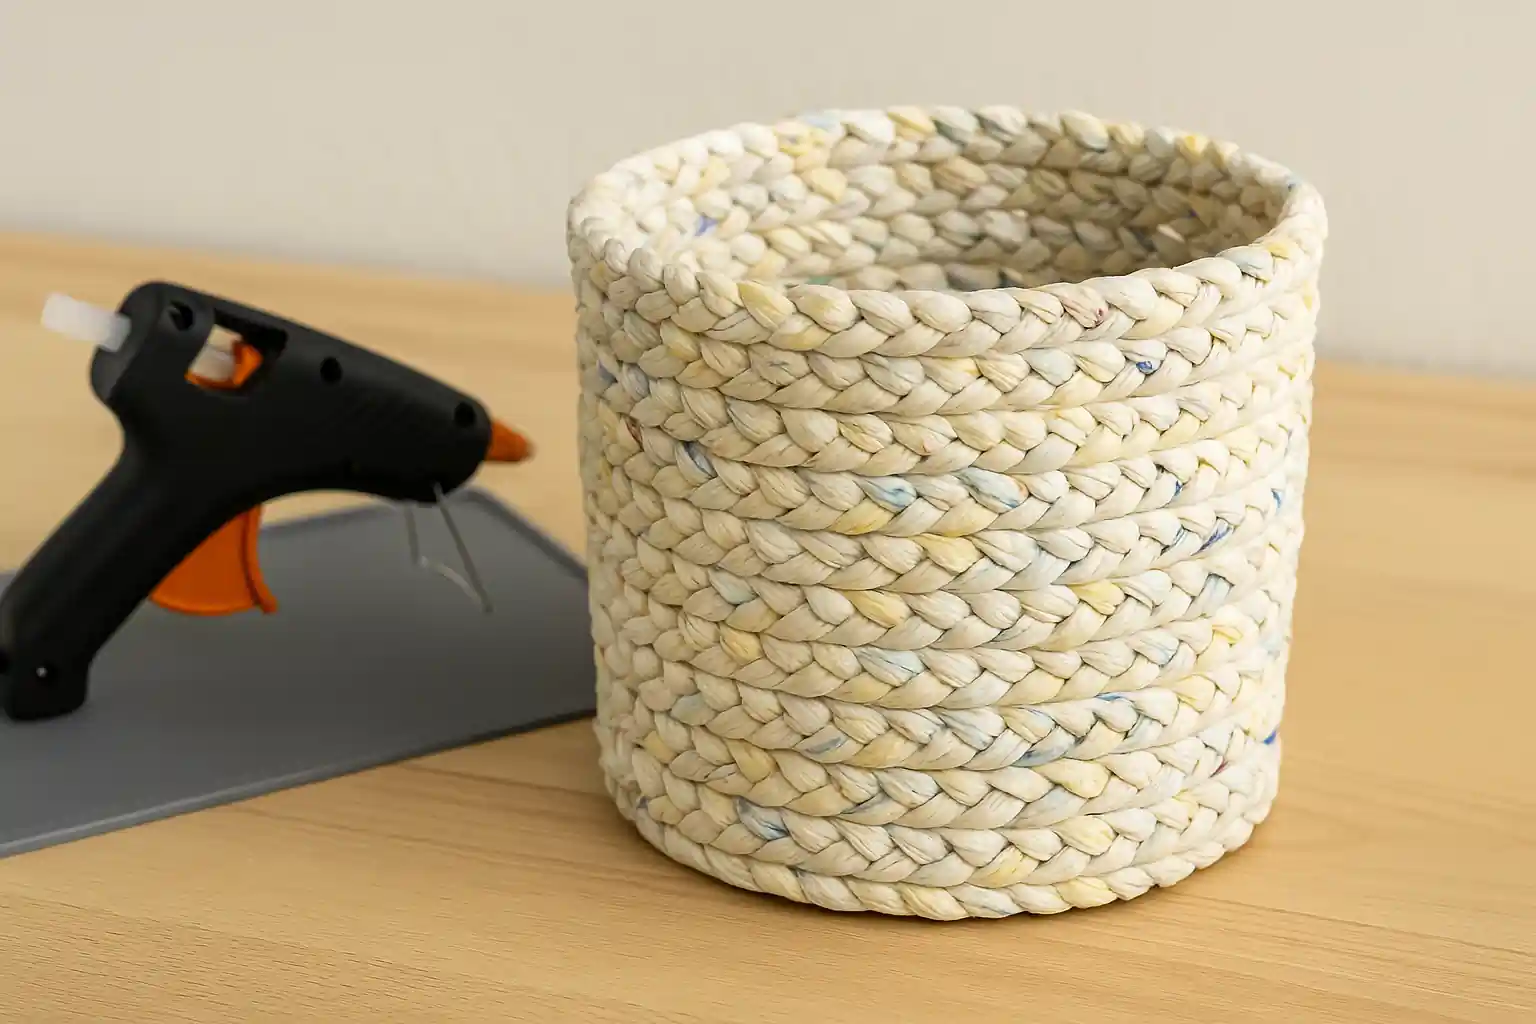
Building the sides
To build the sides, maintain steady pressure on the braid and apply hot glue at regular intervals. Hold each section until the glue sets so the layers adhere securely. As you wind the braid upward, keep the layers aligned so that the sides rise straight. If you want a tapered shape, adjust the angle slightly inward or outward as you glue. When you run out of braid, join another plarn strip as before and continue. Check the height periodically; a typical bathroom trash can stands about ten to twelve inches tall. If you want handles, you can form small loops by leaving gaps on opposite sides and reinforcing them with extra glue. After you reach the desired height, cut the remaining braid and tuck the end between the last two coils, securing it with glue. Run a bead of glue around the top edge to reinforce it.
Finishing touches and decoration
At this point your trash can is functional, but you can add personal touches to enhance its appearance. Some people prefer the colorful, mottled look of different bags showing through the weave. Others paint the finished basket with spray paint to give it a uniform color. If you choose to paint, work in a well ventilated area and apply several light coats rather than a single heavy layer to avoid drips. You can also add a fabric liner to make it easier to clean. Cut a piece of fabric that fits inside the can, fold over the top edge, and sew a simple hem. Drop the liner in and secure it with a few stitches or a line of glue. For a rustic touch, wrap natural twine or ribbon around the rim. Consider adding embellishments like buttons, faux flowers, or tags to personalise your creation. Whatever you choose, make sure decorations do not impede the function of the basket.
Benefits and conclusion
Creating a trash can from grocery bags is more than just a craft project; it is a statement about mindful living. You divert waste from the environment and demonstrate that everyday objects can have a second life. This activity can also be shared with children or friends as a way to teach them about recycling and creativity. Braiding and coiling the plarn is repetitive and calming, making the project a pleasant way to spend an afternoon. When you place your finished can in a bathroom or office, it serves as a gentle reminder of the potential hidden in commonplace items. You might even inspire guests to ask how you made it, opening a conversation about sustainability. Over time, you may find yourself looking at other household waste with new eyes, seeing possibilities instead of trash. By taking a little time to weave something useful, you contribute to a culture that values resourcefulness and environmental care.
Also Read: