DIY Christmas Ornaments Using Recycled Household Items
Christmas decorating feels more personal when you can tell a story about each ornament. DIY Christmas Ornaments Using Recycled Household Items turn familiar things such as cereal boxes, empty tubes, old greeting cards, and fabric leftovers into charming decorations that you can enjoy for many seasons. These ideas are designed for real homes, with simple supplies and room to make each piece your own.
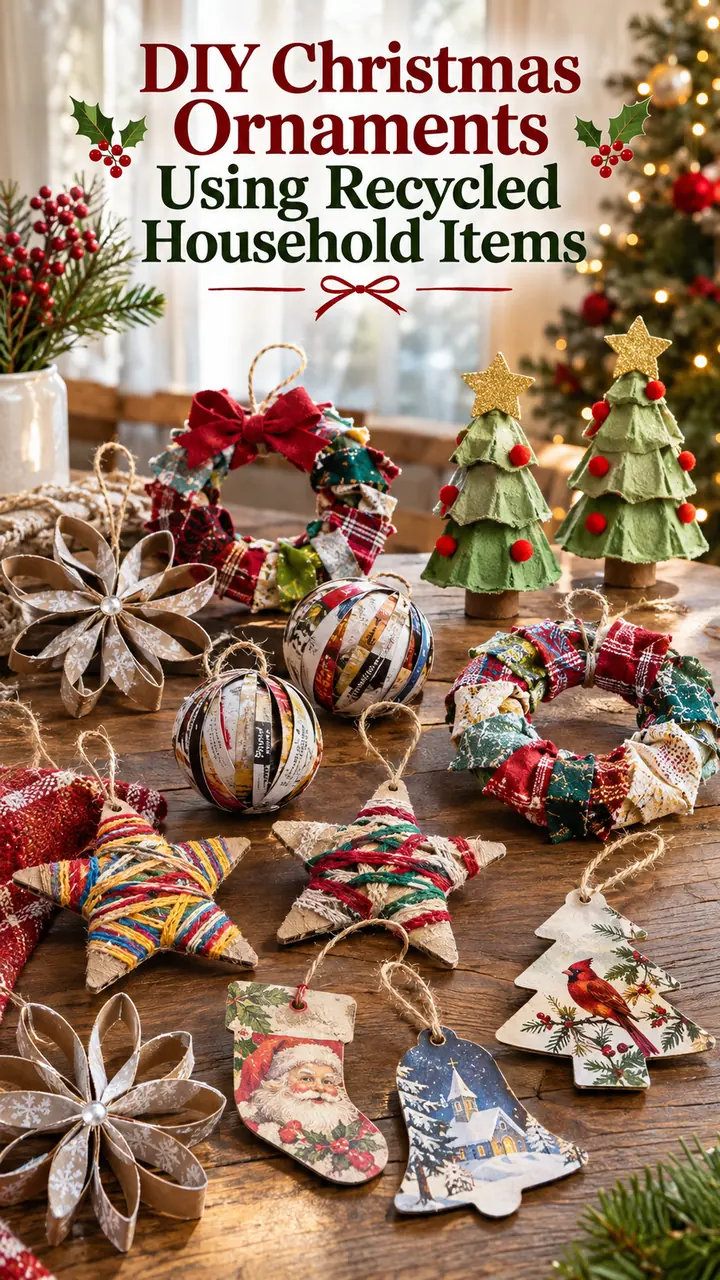
You do not need a large crafting budget or a perfectly stocked supply drawer to start. Gather materials that would otherwise be discarded, choose a few colors you love, and make ornaments in a relaxed afternoon. The twelve projects below range from simple paper shapes to textured keepsakes, so families, beginners, and experienced crafters can all find a favorite.
Cardboard Stars Wrapped in Leftover Yarn
A delivery box can become a set of charming stars with almost no extra supplies. Draw a star onto a flat piece of cardboard, cut out the shape with household scissors, and check that the edges are smooth. Thin cereal box card is easiest for younger crafters, while corrugated cardboard creates a sturdier ornament. Save smaller offcuts for little stars that can fill gaps between larger decorations on the tree.

Wrap each star with leftover yarn, embroidery floss, or clean string from an old package. Begin with a small dab of craft glue on the back, cross the yarn over the points, and continue until the cardboard is mostly hidden. Tuck the final end beneath another strand and add a hanging loop. Neutral cotton yarn creates a Scandinavian inspired look, while mismatched colors make a playful family collection. If the star starts to bend, loosen the wrapping rather than pulling harder.
Paper Tube Snowflakes with Dimensional Petals
Empty paper towel tubes make surprisingly elegant snowflakes. Gently flatten a clean, dry tube and cut it into rings of equal width. Each ring forms an oval petal, so you can arrange six around a center point to create a familiar snowflake shape. Place the petals on a table first and adjust the spacing before using glue. This simple planning step helps each ornament look balanced rather than lopsided.

Join the petals with white craft glue and hold them with clothespins while they dry. For a more detailed design, fold a few extra rings into smaller teardrops and position them between the larger petals. Paint the finished piece white or leave the natural brown cardboard visible. A loop of reused ribbon threads easily between two petals. Keep these ornaments away from moisture because cardboard can soften when it gets damp.
Mini Wreaths from Cereal Boxes and Fabric Scraps
Those narrow pieces of cereal box cardboard left after other projects are perfect for small wreaths. Trace two different sized circles using a mug and a smaller lid, then cut out the ring. The cardboard gives the decoration its shape, while fabric leftovers from old shirts or sewing projects add softness and color. Choose cloth that is clean and completely dry so the finished wreath stores well.

Cut the fabric into narrow strips and wrap them around the ring, securing the beginning and end on the reverse with a little glue. Let colors overlap naturally rather than trying to make every section identical. A button from a worn garment can suggest a festive berry cluster, and a small scrap bow completes the look. Make three or four wreaths in related colors to create a coordinated tree without buying matching ornaments. Hang each one from a fabric loop tied around the top.
Recycled Magazine Paper Ball Ornaments
Old catalogs, magazines, and colorful advertising mail can become light paper ornaments with a surprisingly polished finish. Select pages with similar colors if you want a coordinated look. Cut several strips to the same width, then arrange the pieces so their ends meet in two groups to form the curved ribs of a ball. A small paper circle at each end provides a place to glue the strips securely.

Allow the first end to dry before gently bending the strips around to meet at the second end. The strips should curve without sharp creases. A thread loop tucked under the top circle makes the ornament easy to hang. Vary the length of your strips to create large and small paper balls. Matte magazine pages give a soft look, while glossy pages catch Christmas lights beautifully. Store each ball in a separate compartment so the curved paper does not get crushed.
Egg Carton Christmas Trees
The pointed sections of a paper egg carton already resemble little trees. Use a clean carton without food residue, separate several cone shaped sections with scissors, and stack them from widest to narrowest. This works best with molded paper cartons rather than foam because the paper takes glue and paint more easily. Save a small cardboard offcut to make a stable base if you prefer to display some trees on a shelf.

Paint the cones green, cream, or a favorite holiday shade, then let them dry completely. Layer two or three pieces with small dots of glue and add a reused button or paper star at the top. For hanging ornaments, secure a thread loop inside the upper cone before joining the layers. Tiny circles punched from colorful junk mail resemble baubles without relying on plastic glitter. Keep the structure lightweight, since a heavy decoration at the top can make the ornament tip or hang at an angle.
Old Holiday Card Keepsake Ornaments
Beautiful greeting cards deserve more than one December on display. Choose cards with memorable messages, detailed illustrations, or festive patterns and turn them into keepsakes. Cut a simple circle, bell, or tree silhouette from the front of each card. You can also glue two shapes back to back so both sides look finished when the ornament turns on the branch.

For a layered design, cut a smaller shape from a second card and attach it to the center with a paper spacer. A hole punch creates a neat opening for reused string without tearing the card. Write the year on the reverse if that information matters to your family, but keep the original handwriting whenever possible. These pieces make thoughtful gifts for relatives who sent the cards. Avoid cutting irreplaceable cards unless you are comfortable transforming them; a photocopy or saved extra is a better choice for a particularly sentimental message.
Bottle Cap Snowman Faces
Clean plastic bottle caps can turn into cheerful miniature snowman faces that take up very little room on the tree. Choose caps of similar size so the collection feels intentional, then wash and dry them thoroughly. Instead of making holes in hard plastic, attach each cap to a small recycled cardboard backing with a hanging loop trapped securely between the layers. This keeps the project simple and avoids sharp tools.

Paint the front white if needed, then add eyes, a carrot shaped nose, and a gentle smile using paint markers or tiny paper pieces. A narrow strip of leftover cloth makes a scarf underneath the face, and a scrap of dark paper can suggest a hat. Test the glue bond after it dries before hanging. Bottle caps are small parts, so keep them out of reach of very young children. These ornaments look especially cute grouped together on a tabletop tree or placed around the lower branches of a large one.
Denim and Sweater Scrap Tree Decorations
Worn jeans and old sweaters often have sturdy sections worth saving even when the clothing itself cannot be repaired. Draw a simple tree, heart, or stocking on the back of the fabric and cut two matching shapes. If the material is thin, glue a piece of cereal box card between them for structure. Denim creates a crisp silhouette, while sweater fabric gives the decoration a warm, cozy surface.

Use fabric glue to join the edges, leaving a little room at the top for a loop made from an old shoelace or ribbon. Add simple details using buttons, leftover thread, or small patches from another garment. Avoid heavy embellishments that pull on the fabric and make it sag. If you prefer a soft ornament, use fabric scraps as gentle stuffing instead of cardboard. Let glue dry fully before hanging and store these pieces in a dry box so they keep their shape year after year.
Jar Lid Picture Frame Ornaments
A clean metal jar lid can frame a tiny drawing, piece of wrapping paper, or family photograph. Choose lids with smooth edges and avoid any that are rusty, bent, or sharp. Trace the inside of the lid onto a recycled card and cut the circle slightly smaller so it sits neatly inside. A winter landscape made from scraps of white and green paper creates a lovely little scene without additional craft supplies.

Glue the paper circle into the lid, then decorate with a small tree, star, or handwritten holiday greeting. Attach a strong ribbon loop to the reverse with glue suitable for metal and allow the bond to cure according to the label. Check the hanger before placing the lid above breakable decorations. If the lid feels too heavy for a delicate branch, use it on a sturdier part of the tree or as a gift topper. Matching lid frames also make a thoughtful set of homemade holiday keepsakes.
Newspaper and Junk Mail Paper Chains
Short paper chains can work as individual hanging ornaments, not just long garlands. Reuse newspaper, envelopes, or unwanted colorful mail to make a series of small linked circles. Cut strips of equal width and build a chain with three to five links using a dot of glue or a small piece of paper tape. Alternating plain print with bright colored paper gives the links an interesting rhythm.

Turn a short chain into a droplet ornament by joining its ends around a hanging loop, or attach two short chains beneath a cardboard star for extra movement. You can also fold the strips before linking them to create slightly squared shapes. Make each ornament small enough that it will not catch neighboring branches. Paper chains are excellent for group craft sessions because everyone can contribute a few links. Keep them dry and flatten gently between sheets of paper when putting them away.
Scrap Ribbon and Button Christmas Trees
Leftover gift ribbon, fabric ties, and spare buttons can form adorable Christmas trees on a recycled cardboard base. Cut a small triangle from a cereal box and cover it with short ribbon lengths laid across the shape. Start with the longest piece at the bottom and gradually use shorter pieces toward the top. Let the edges extend slightly past the triangle for a casual layered effect.

Glue each strip on the back of the triangle, then cover the reverse with another piece of card for a tidy finish. Sewn on or glued buttons can become ornaments, but they are optional if you want an even lighter piece. A small rectangle of brown card adds a trunk and an old ribbon loop becomes the hanger. Choose a limited color palette for an elegant look or mix everything in your scrap basket for bright, playful decorations. Make sure every embellishment is firmly attached before use.
Folded Gift Wrap Paper Stars
Small pieces of clean used wrapping paper are often too awkward for another gift but perfect for a star ornament. Select sheets with minimal creasing and trim away any tape or torn edges. Fold a square into a simple paper fan, pinch it at the middle, and spread the ends outward to create a starburst. A second folded fan joined to the first can make a fuller shape.

Use a small amount of glue at the center and press the sections together until secure. If the paper is very thin, reinforce the back with a tiny circle cut from a discarded card. Thread a loop through a folded section before the final join, rather than making a hole later. Mixing patterned gift wrap with plain brown packing paper creates a balanced look that suits rustic or colorful Christmas trees. Store the stars flat between sheets of clean paper to protect their folds for next season.
How to Choose and Prepare Recycled Materials
Before gathering supplies for DIY Christmas Ornaments Using Recycled Household Items, check the recycling bin, junk mail stack, fabric basket, and gift wrap drawer. Choose items that are clean, dry, and easy to shape. Paper, cardboard, fabric, and lightweight caps are especially practical. Skip anything with food residue, mold, sharp edges, or damage. Let children help with drawing and decorating, and have an adult handle difficult cutting. A basic craft setup with scissors, paper glue, string, a pencil, and washable paint can support most of these projects without a shopping trip. Group materials by color rather than type if you want the finished ornaments to feel coordinated.
Make Handmade Ornaments Last for Years
Durability matters as much as appearance when your goal is to reuse decorations each Christmas. Let paint and glue dry fully, test every hanging loop with a gentle tug, and choose a branch that can carry the ornament without bending. Keep paper pieces away from candles, heat sources, and damp windows. Avoid loose small decorations around toddlers or pets. Once the holidays end, wrap fragile pieces in saved tissue paper and pack them in a labeled box. Place heavier jar lid ornaments at the bottom, with paper stars and snowflakes above them. Reusing the same ornaments every year is what gives these small household projects lasting value.
Style a Christmas Tree with Recycled Ornaments
You do not have to fill an entire tree with one kind of craft. Start with two or three recurring shapes, such as yarn stars, cardboard snowflakes, and fabric wreaths, then add a few personal keepsake ornaments. Repeat similar colors across the branches to make different recycled materials look intentional together. Place larger pieces deeper in the tree and hang delicate paper pieces closer to the tips. Save a few handmade ornaments for wrapped gifts or a small tabletop display. When family members create something different each year, the tree becomes a collection of stories instead of a display that needs replacing.
Conclusion
DIY Christmas Ornaments Using Recycled Household Items show how a little creativity can give everyday materials a second life. Start with the easiest paper or cardboard project, then try a fabric keepsake or a tiny framed scene as your confidence grows. Choose secure hangers, store each ornament carefully, and bring the favorites out again next December. A tree decorated with handmade pieces can feel welcoming, distinctive, and full of memories without relying on a pile of new supplies.